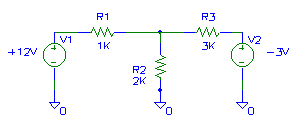
Figure 1 - Circuit to be analyzed.
by Harold Hallikainen
In the first few parts of this series, we've used "differential Ohm's Law," Kirchoff's Current Law, Kirchoff's Voltage Law, node voltage analysis, and mesh analysis to analyze a simple three resistor circuit (figure 1). This time, we'll use Thevenin's Theorem to simplify the circuit, which cannot be analyzed by Ohm's Law by itself, down to something that can be analyzed using Ohm's Law. We'll also look at a couple ways to analyze a Wheatstone Bridge circuit using Thevenin's Theorem.
In doing research for this article, I found hundreds of books that discussed the application of Thevenin's Theorem, but very little about its origin. I did find that Thevenin's Theorem was apparently first published by Herman Von Helmholtz (1821 - 1834) in 1853. Helmhotz was a German scientist who worked in a wide variety of sciences. He was originally trained as a doctor, since the German government would pay for his training if we would then serve in the military. One reference stated "Helmholtz was the last scholar whose work, in the tradition of Leibniz, embraced all the sciences, as well as philosophy and the fine arts." I was unable to find a translation of his original stating of this theorem.
M. L. Thevenin (1857 - 1926), a French telegraph engineer, again discovered the theorem in 1883 (see rendus hebdomadaires de seances de L'Academie des sciences, XCVII, 159 (1883), excuse my French!).
Finally, I also found a reference to it as the Thevenin-Pollard theorem. And, in 1926, E. L. Norton of Bell Telephone Laboratories replaced the voltage sources in the Thevenin (or whoever) equivalent with current sources to come up with the Norton equivalent. We'll look at Thevenin equivalents this time and Norton equivalents in a later article.
Figure 1 - Circuit to be analyzed.
Let's find the Thevenin equivalent of the "left half" of the circuit (replacing V1, R1 and R2). Other equivalents are possible, but care must be taken that you don't replace too much of the circuit with the equivalent, leaving points of interest "inside" the equivalent where they are not available for analysis. Figure 2 shows the circuit we wish to "Thevenize". Figure 3 shows how it has been replaced by a single "Thevenin voltage" and a single "Thevenin resistance".
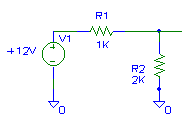
Figure 2 - Circuit to be Thevenized.
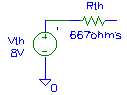
Figure 3 - Thevenin equivalent of figure 2
To determine the Thevenin voltage take the original circuit for which the equivalent is desired (figure 2), and place an "imaginary voltmeter" across the two terminals that connected this subcircuit to the remainder of the circuit. In this case, we measure the voltage at the junction of R1 and R2 with respect to ground. This "open circuit voltage" is the Thevenin voltage. In this circuit, it was easily determined using Ohm's Law or using the voltage divider formula (12V*(2K/3K)=8V).
To determine the Thevenin resistance (or, in AC circuits, the Thevenin impedance ), replace all independent voltage sources with zero volt sources (a short) and replace all independent current sources with zero amp sources (an open). Place an "imaginary ohmmeter" the same place we put the voltmeter above. In this case, the shorting of V1 puts R1 in parallel with R2, yielding a Thevenin resistance of 667 ohms. The Thevenin equivalent of figure 2 is shown in figure 3. Figure 4 shows the original circuit with V1, R1 and R2 replaced by their Thevenin equivalent.
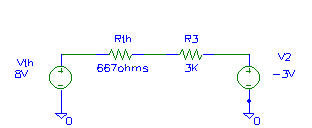
Figure 4 - Original circuit with equivalent.
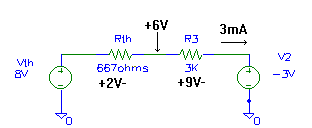
Figure 5 - Analyzing the equivalent circuit.
Using Ohm's Law, we can determine the voltages across Rth and R2, as shown in figure 5. To determine the voltage at the junction of Rth and R3, we can start at the right side of R3, which is at -3 volts due to V2, then "go up" 9 volts as we pass through R3 to the left. This puts the junction at +6 volts, as shown. We could also start at the top of Vth (+8 volts) and go down 2 volts as we go to the right through Rth. Again, we get +6 volts.
Next time, we'll try applying two Thevenin equivalents to the Wheatstone bridge. Your homework assignment is to find out who Wheatstone was, and why he got a bridge named after him.